Colorbond fencing installation is straightforward when you have the right materials, accurate measurements, and a clear installation plan. However, mistakes with post spacing, rail alignment, or uneven ground can lead to unnecessary adjustments and additional labour costs.
This guide explains how to install a Colorbond fence in 10 practical steps, from preparing the fence line to installing steel panels and completing the final inspection. You’ll also learn how to handle sloping ground, concrete surfaces, and common installation problems.
Whether you’re a contractor, builder, or project buyer, these tips will help you plan a more reliable installation.
How to Install a Colorbond Fence: 10-Step Overview
A typical Colorbond-style steel fence consists of steel posts, horizontal rails, profiled steel sheets, and connecting hardware.
Follow these 10 steps:
- Check boundaries and regulations. Confirm the fence location and local requirements.
- Measure the fence line. Mark corners, gates, and changes in ground level.
- Calculate materials. Check the required posts, rails, sheets, and accessories.
- Prepare the site. Remove obstacles and organise your tools.
- Mark and dig post holes. Follow the approved spacing and footing specifications.
- Install fence posts. Align the posts and allow the concrete to gain sufficient strength.
- Position horizontal rails. Check rail alignment and connections.
- Install steel infill sheets. Fit the sheets according to the selected panel system.
- Add finishing components. Complete the top rails, post caps, and gate hardware.
- Inspect the finished fence. Check alignment, fasteners, and surface condition.
The exact sequence may vary between manufacturers.
Before starting, confirm that all components belong to a compatible fencing system. Different Colorbond-style fence profiles may have different sheet shapes, rail configurations, and connection requirements.
What You Need Before Installing Colorbond Fencing
Having the correct materials and equipment ready before construction helps reduce installation delays.
Main Colorbond Fence Components
A typical modular steel fencing system includes fence posts, horizontal rails, steel infill sheets, fasteners, and finishing accessories.
The main components and their functions are shown below.
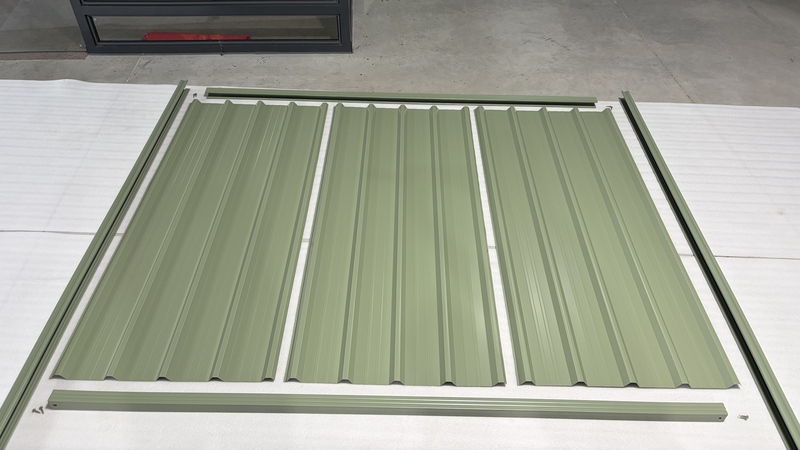
| Component | Main Function | Checks Before Ordering |
|---|---|---|
| Fence posts | Support the fence bays and transfer loads to the foundations. | Confirm post length, wall thickness, rail compatibility and installation method. |
| Horizontal rails | Connect the posts and hold the profiled infill sheets. | Check rail length, channel dimensions, connections and the required rail arrangement. |
| Steel infill sheets | Provide the privacy surface within each fence bay. | Confirm the panel profile, effective coverage width, thickness and coating specification. |
| Fasteners and brackets | Secure the rail and post connections. | Use the specified compatible hardware and confirm the quantities. |
| Post caps | Finish exposed post ends and help keep out debris. | Match the cap to the selected post section. |
| Gates and gate hardware | Provide pedestrian or vehicle access where required. | Confirm opening dimensions, swing direction, hinges, latch and supporting post requirements. |
Common fence heights include 1.5 m, 1.8 m, and 2.1 m, depending on project requirements.
JZH Fence supplies Colorbond-style steel fencing systems for residential developments, commercial boundaries, and wholesale distribution.
When ordering a complete system, pay particular attention to the posts.
Post length, wall thickness, rail compatibility, and installation method all affect the final installation. Our Colorbond fence post size guide explains the specifications that contractors and bulk buyers should confirm before ordering.
Essential Installation Tools
You will need basic equipment for measurement, excavation, and fence assembly.
Common installation tools include:
- Measuring tape and string line
- Wooden stakes or marking pegs
- Spirit level or laser level
- Post-hole digger or mechanical auger
- Shovel and concrete mixing equipment
- Cordless drill and suitable screwdriver bits
- Clamps for holding components
- Metal-cutting tools suitable for pre-painted steel
- Safety glasses, gloves, and protective footwear
A laser level can be particularly useful when installing long fence runs or working on sites with changing ground levels.
When cutting steel sheets, use suitable equipment and follow the manufacturer’s instructions. Avoid cutting methods that damage the protective coating or leave excessive metal particles on the finished surface.
Check Local Council Rules and Property Boundaries
Before installing Colorbond fencing, confirm the legal boundary and applicable construction requirements.
Fence regulations vary between Australian states and local councils.
For example, the NSW Planning Portal explains that many residential side and rear boundary fences up to 1.8 m high can qualify as exempt development when the relevant conditions are satisfied.
Different requirements may apply to front boundaries, corner sites, heritage areas, and other restricted locations.
In Victoria, neighbouring property owners may have responsibilities under fencing legislation. The Victorian Government’s fencing guide explains dividing fences, neighbour agreements, and fencing notices.
You should also check underground services before digging.
Before You Dig Australia provides a referral service for obtaining available underground infrastructure information. Depending on site conditions, further on-site locating may be required.
Important: Do not begin excavation until the boundary, relevant approvals, and underground-service risks have been checked.
Planning the Fence Line and Calculating Materials
Good planning helps keep the finished fence straight and reduces material waste. For help choosing a panel style before setting out the fence line, compare our modern Colorbond-style fence designs for privacy, airflow and appearance.
Measure Fence Length and Post Spacing
Start by measuring the total fence length.
Mark the beginning and end of the fence, then identify corners, changes in direction, and gate openings.
Many Australian modular steel fence systems use bays around 2.4 m wide, although the actual post spacing depends on the manufacturer and selected system.
For example, a straight 24 m fence using a nominal 2.4 m bay width would require approximately:
- 10 fence bays
- 11 posts for a simple straight run
- Rails and infill sheets according to the system design
These are preliminary quantities, not a final installation specification.
The approved layout must account for the actual post centres, rail lengths, and effective sheet coverage.
Calculate Fence Panels, Posts, and Rails
Use a material take-off before placing your order.
| Material | Preliminary Calculation | Important Conditions |
|---|---|---|
| Fence bays | Example: a 24 m straight run divided by a nominal 2.4 m bay width gives 10 bays. | Confirm the actual post centres, rail lengths and effective sheet coverage for the selected system. |
| Fence posts | The same simple 10-bay straight run uses 11 posts. | This example excludes gates, corners, separate runs and other layout changes. |
| Horizontal rails | Multiply the bay count by the number of rails specified for each bay. | A common 1.8 m privacy fence uses a top and bottom rail; other designs may need additional components. |
| Steel infill sheets | Multiply the bay count by the sheets required for each bay. | Use the effective coverage after the specified overlaps, rather than the overall sheet width. |
| Caps, fasteners and connectors | Count the accessories required by the approved system layout. | Confirm the quotation covers the complete system and the correct compatible parts. |
| Gates and special components | Count the gate openings and any slope, corner or surface-fixing requirements separately. | Confirm gate dimensions, supporting posts and installation details before production. |
Remember that one fence bay may require several overlapping steel sheets, depending on their effective coverage width.
For bulk orders, check whether the quotation includes a complete system or only individual panels.
Our Colorbond-style fence panel buying guide explains the purchasing details that contractors and distributors should confirm before ordering.
Consider Slopes, Gates, and Corners Before Ordering
A fence installed on uneven ground may require different post lengths, panel dimensions, or rail arrangements.
Check the site for:
- Sloping ground and changes in elevation
- Corners and changes in direction
- Concrete or paved installation areas
- Retaining walls
- Pedestrian or vehicle gates
- Underground obstacles
These conditions affect material quantities and installation methods.
Confirm the site layout before production whenever possible. This helps avoid ordering standard components that may not fit the actual project.
Step-by-Step Colorbond Fencing Installation Guide
The following steps describe a typical modular steel privacy fence installation.
Always follow the manufacturer’s installation instructions, approved footing design, and applicable local regulations.
Step 1: Prepare and Clear the Fence Line
Walk along the proposed fence line before starting construction.
Remove vegetation, loose debris, and obstacles that may interfere with installation.
If an existing fence needs to be replaced, remove the old panels, posts, and footings where required.
Check the ground conditions and identify possible underground or above-ground obstructions.
Avoid unnecessary changes to drainage or ground levels.
For larger projects, make sure there is enough working space for materials, equipment, and installers.
Installation tip: Keep the work area clear before marking post positions. Obstacles can affect measurements and make the fence line difficult to maintain.
Step 2: Mark the Fence Post Positions
Use stakes and a string line to establish a straight reference line.
Mark each proposed post location according to the approved layout.
Check gate openings and corner positions first. Then mark the remaining bays.
If the final bay is much shorter than the others, consider adjusting the layout to achieve a more balanced appearance.
For long fence lines, a laser level can help maintain accuracy.
Measure twice before digging. Incorrect post spacing may prevent the rails and panels from fitting correctly.
Step 3: Dig the Post Holes
Dig each hole at its marked location.
The required footing depth and diameter depend on fence height, soil conditions, wind exposure, and engineering requirements.
Some standard residential fence configurations use footing depths around 600 mm, but this is not a universal requirement.
For example, a taller fence or a site exposed to strong winds may need a different footing design.
Remove loose material from the bottom of each hole.
If excavation reveals underground services or unexpected obstacles, stop and reassess the location safely.
Important: Confirm footing dimensions against the selected system’s engineering requirements rather than using the same hole depth for every project.
Step 4: Set the Fence Posts in Concrete
Position the first post in its hole.
Check its alignment against the string line and use a spirit level to ensure that it is vertical.
Brace the post temporarily before placing concrete.
Continue with the remaining posts, checking their position and height as you work.
The post height must allow the rails and infill sheets to reach the intended finished fence height.
Use concrete suitable for the approved footing design.
Allow it to gain sufficient strength before installing components that place significant loads on the posts.
The necessary waiting period depends on the concrete type, site temperature, and design requirements.
Installation tip: Check each post for vertical alignment in two directions before the concrete sets.
Step 5: Install the Horizontal Rails
Once the posts are ready, begin fitting the horizontal rails.
A common 1.8 m modular privacy fence uses two rails: one at the bottom and one at the top.
Other configurations may require additional components.
In many systems, the bottom rail is fitted first, followed by the steel infill sheets and then the top rail.
Check that each rail is seated correctly and aligned with the adjacent bays.
Use the specified brackets or fasteners.
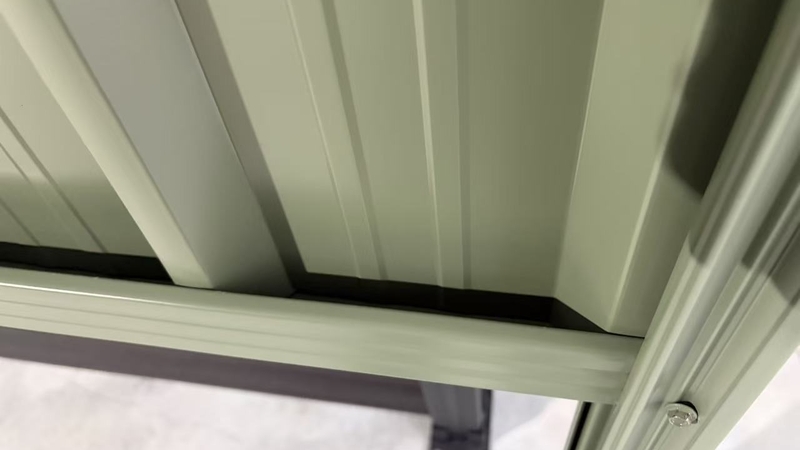
Do not force a rail into position if the posts are incorrectly spaced. Recheck the measurements before making adjustments.
Step 6: Fit the Steel Infill Sheets
Install the steel sheets according to the selected profile and assembly instructions.
For overlapping systems, insert the sheets in the required sequence.
Check the overlap and ensure the panels sit correctly inside the rail channels.
The sheets should fit without excessive force or visible distortion.
If a sheet does not fit, recheck the post spacing, rail position, and effective sheet coverage.
Do not immediately cut the panel to compensate for a measurement error.
When trimming is necessary, use suitable tools and remove metal swarf from the painted surface.
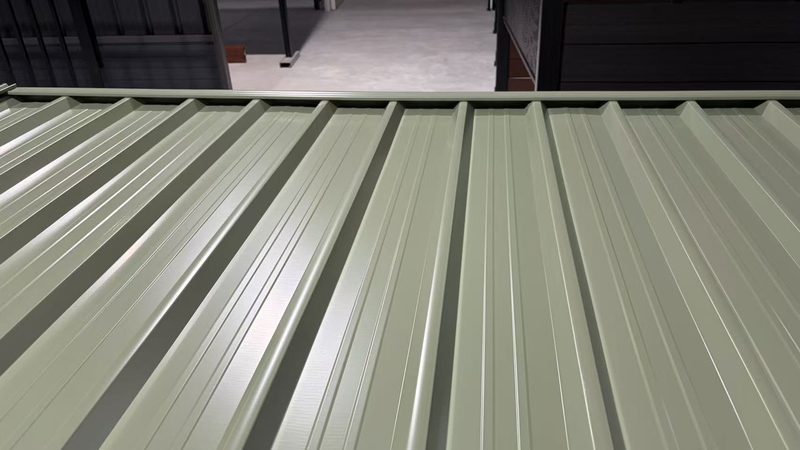
Installation tip: Protect the factory-applied coating during cutting and assembly to reduce the risk of future corrosion.
Step 7: Install the Top Rail and Post Caps
After fitting the infill sheets, install the top rail or finishing channel as required.
Make sure the sheets remain properly positioned.
Check the rail connections and tighten the fasteners according to the manufacturer’s requirements.
Fit the post caps to the exposed post ends.
Post caps improve the finished appearance and help protect open post sections from debris.
Use compatible post caps and rail components rather than assuming parts from different suppliers will fit.
Step 8: Handle Corners and Changes in Ground Level
At corners, use the appropriate post and rail connection arrangement.
Avoid improvising connections that have not been designed for the system.
On sloping ground, decide whether the fence should follow the gradient or be installed in steps.
The choice may affect panel dimensions, post lengths, and gaps beneath the fence.
These options are explained in the sloping-ground section below.
Step 9: Install Gates and Accessories
If the fence includes a gate, confirm the opening width, swing direction, frame design, and required hardware.
Gate posts may need additional reinforcement because they carry different loads from ordinary fence posts.
Install the hinges, latch, and other hardware according to the approved design.
Check that the gate opens and closes smoothly without dragging or placing excessive force on the supporting posts.
For large or automated gates, specialist design and installation may be required.
Installation tip: Confirm gate dimensions and supporting post requirements before ordering the fence materials.
Step 10: Inspect the Finished Fence
Walk along the full fence line.
Check that:
- Posts are correctly aligned.
- Rails follow the approved layout.
- Steel sheets are properly fitted.
- Fasteners are secure.
- Post caps are installed.
- Gates operate correctly.
- No sharp burrs or loose metal debris remain.
- The protective coating has not been unnecessarily damaged.
Remove steel offcuts, drilling debris, and unused screws.
For commercial projects, record the completed dimensions and any approved variations from the drawings.
A final installation inspection helps identify small problems before they become maintenance or warranty issues.
Common Colorbond Fence Installation Mistakes and How to Avoid Them
JZH Fence Installation Experience: Check Component Compatibility Before Installation
One important consideration when supplying modular fencing is ensuring that all components work together correctly.
Problems can occur when post spacing, rail dimensions, panel profiles, or accessories do not match.
For installers, these issues may cause extra cutting, fitting adjustments, and delays.
For bulk buyers, they can also increase replacement and labour costs.
The following table summarises common installation problems and recommended preventive checks.
| Installation Mistake | Possible Result | How to Avoid It |
|---|---|---|
| Incorrect post spacing | Rails or infill sheets do not fit, leading to extra cutting and adjustments. | Mark the approved layout and recheck post centres before digging or setting posts. |
| Using one footing depth for every project | The footing may not suit the fence height, soil conditions or wind exposure. | Use the footing dimensions required for the selected system and site. |
| Poor post or rail alignment | The completed fence has an uneven line or distorted panel fit. | Use a string line and level, and check posts in two directions before the concrete sets. |
| Mixing incompatible components | Posts, rails, panels or caps require avoidable fitting adjustments. | Confirm the complete compatible system before ordering and production. |
| Forcing or cutting sheets before checking the fit | Measurement errors remain and the coating may be unnecessarily damaged. | Recheck post spacing, rail position and effective sheet coverage first. |
| Leaving cutting or drilling debris on the coating | Metal particles can cause rust staining after exposure to moisture. | Remove swarf, offcuts and unused screws after cutting and assembly. |
| Ignoring slopes or gate loads during planning | Unexpected bottom gaps, unsuitable components or inadequate gate supports. | Measure ground-level changes and confirm gate dimensions and post requirements before ordering. |
JZH Fence has also introduced accessory improvements based on product development and installation considerations.
For example, our TPU post cap option is designed to provide greater fitting flexibility for compatible Colorbond-style fence posts.
You can find more information in our Colorbond fence post specifications guide.
For wholesalers and contractors, we recommend confirming the complete system before production, including posts, rails, infill sheets, post caps, and connecting hardware.
Key takeaway: A compatible fence system is generally easier to install than separately purchased components that have not been checked together.
Installing Colorbond Fencing on Sloping Ground
Sloping ground is one of the conditions that can make fence installation more complicated.
If the slope is not considered during planning, the finished fence may have an uneven top line or large gaps beneath the panels.
Two common installation methods are stepped fencing and raked fencing.
Stepped vs Raked Colorbond Fencing
Stepped fencing keeps each bay horizontal while the fence changes height between sections.
The finished structure follows a staircase pattern.
Raked fencing adjusts compatible rails and panels to follow the slope more continuously.
The appropriate choice depends on the gradient, product design, appearance requirements, and installation complexity.
| Method | Finished Fence Line | Planning Considerations | Checks Before Ordering |
|---|---|---|---|
| Stepped fencing | Each bay remains horizontal, with height changes between bays creating a staircase pattern. | Often easier to plan where ground levels change considerably; check the resulting gaps beneath the bays. | Measure the ground-level difference across every bay, required post lengths and acceptable bottom gaps. |
| Raked fencing | Compatible rails and panels follow the slope more continuously. | Can provide a smoother line on suitable slopes when the selected system supports the required angle. | Confirm the allowable rake angle, rail connections, panel geometry, dimensions and ground clearance. |
Stepped fencing is often easier to plan when ground levels change considerably.
Raked fencing may provide a smoother appearance on suitable slopes, provided the selected system supports the required angle.
The correct installation method should be based on actual site measurements, not appearance alone.
How to Handle Gaps Under Fence Panels
On sloping or uneven ground, gaps may appear between the bottom rail and the soil.
These gaps can affect privacy, appearance, and the finished fence height above ground.
One option is to install a fence plinth beneath the bottom rail.
For relevant JZH Fence systems, aluminium plinths can help close suitable gaps and create a cleaner finish.
However, closing a gap and retaining soil are different structural functions.
An aluminium plinth should not be assumed suitable for retaining soil unless the specific system has been designed for that purpose.
For further guidance, see our Colorbond fence plinths and retaining options guide.
Choosing the Right Installation Method for Your Project
JZH Fence Project Advice: Confirm the Slope Before Ordering Materials
When reviewing a sloping fence project, the overall slope angle is only one factor.
Three additional details should be checked.
1. Ground-level difference between posts
Measure the height change across each proposed fence bay.
A long boundary may contain several different gradients, so one overall slope measurement may not be enough.
2. Acceptable gaps beneath the fence
Some projects require a close fit to the ground for privacy or appearance.
Others may tolerate larger gaps.
The acceptable ground clearance affects the installation method and possible plinth requirements.
3. Available panel and rail configurations
Not every steel fencing system can be raked to the same angle.
The allowable rake depends on the manufacturer’s design, rail connections, and panel geometry.
At JZH Fence, project buyers can provide site photographs, fence-line drawings, ground-level measurements, and required panel dimensions when discussing a sloping installation.
These details help assess whether standard components are suitable or whether customised lengths and aluminium plinths should be considered.
For large projects, confirm the slope and bottom-gap requirements before manufacturing the full order.
Colorbond Fence Installation on Concrete and Special Surfaces
Not every Colorbond-style fence can be installed using posts embedded directly into the soil.
Some projects require installation on concrete slabs, paved areas, or near retaining walls.
Installing Fence Posts on Concrete
For suitable concrete surfaces, fence posts may be installed using base plates and approved anchors.
The general process involves marking the post locations, checking the base-plate positions, drilling the required anchor holes, and securing the posts.
However, the concrete must have sufficient strength, thickness, reinforcement, and edge distance to support the fence loads.
Do not assume that an existing paving slab is structurally suitable for a full-height steel privacy fence.
Where necessary, the fixing arrangement and supporting concrete should be assessed by a qualified engineer.
Installing Fencing Near Retaining Walls
A fence installed on top of a retaining wall introduces additional loading.
Wind forces acting on the fence can transfer into the retaining structure and its foundations.
Before installation, confirm whether the wall was designed to support these loads.
If the required capacity is unknown, obtain structural advice rather than relying on standard fence-post fixings.
The fence and retaining wall should be assessed as a connected structural system where applicable.
Coastal and High-Wind Installations
Coastal projects require additional attention to salt exposure, moisture, wind conditions, and corrosion protection.
Steel grade, metallic coating, surface finish, and fastener selection all affect long-term performance.
For Australian Colorbond-style fence projects, JZH Fence commonly works with G550 steel and project-specific coating configurations.
Options may include AZ150, AM100, or other specified metallic coating systems, depending on the material and order requirements.
These coating designations should not be treated as interchangeable without reviewing the actual specifications.
For a detailed explanation of corrosion risks, see our guide to Colorbond fencing rust and prevention.
For high-wind sites, the post size, spacing, footing design, and connections must also satisfy the applicable engineering requirements.
Key takeaway: Coastal and high-wind fence projects need a specification matched to the actual environment, not just a standard panel size.
Final Inspection and Maintenance Tips
A completed fence should be checked before the installation team leaves the site.
Installation Quality Checklist
Pay particular attention to the following items:
- Post alignment: Posts should be vertical and correctly positioned.
- Rail alignment: Rails should follow the approved layout.
- Panel fit: Infill sheets should sit correctly without significant distortion.
- Fasteners: Connections should be secure.
- Surface condition: Remove scratches, burrs, and metal particles where possible.
- Post caps: Check that all required caps are fitted.
- Gate operation: Gates should open, close, and latch correctly.
- Ground clearance: Bottom gaps should match the project requirements.
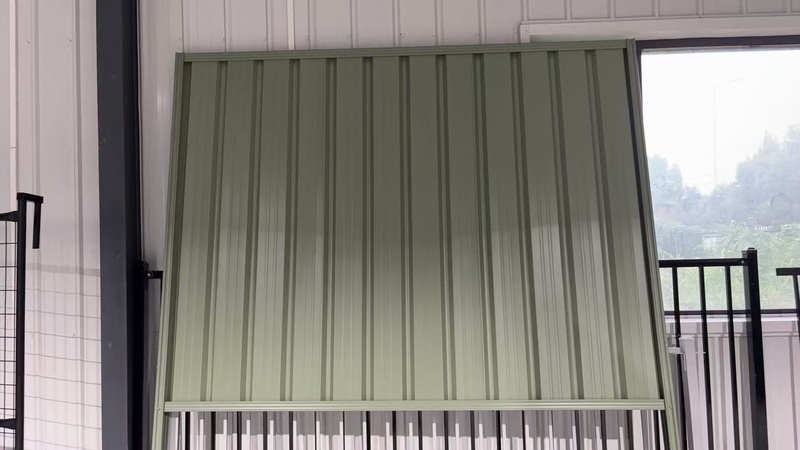
For larger projects, keep installation photographs and inspection records.
Preventing Corrosion After Installation
Even corrosion-resistant steel fencing requires careful handling.
Metal particles left on painted surfaces can create rust staining after exposure to moisture.
Remove cutting and drilling debris immediately after installation.
Avoid unnecessary damage to the protective coating when tightening screws, moving sheets, or fitting rails.
If the coating is scratched, follow the manufacturer’s recommended repair procedure.
Not every coating system should be repaired using generic spray paint.
Simple Maintenance for Long-Term Performance
Colorbond-style steel fencing generally requires less routine maintenance than timber fencing because it does not need regular staining.
However, periodic cleaning and inspection are still important.
Wash away accumulated dirt and salt deposits with clean water when required.
Check exposed edges, fasteners, and locations where moisture may collect.
The official COLORBOND® steel fencing guidance provides information about genuine COLORBOND® steel fencing and its maintenance requirements.
For JZH Fence products, follow the cleaning and maintenance recommendations for the coating system supplied.
Regular cleaning and inspection can help reduce avoidable corrosion and maintenance problems.
DIY vs Professional Colorbond Fence Installation
A short fence on flat ground may be manageable for someone with suitable tools and installation experience.
However, more complicated projects often require professional assistance.
The following table provides a general guide.
| Project Condition | DIY Consideration | Professional Support to Consider |
|---|---|---|
| Short fence on flat ground | May be manageable with suitable tools, relevant installation experience and the selected system instructions. | Use an installer if excavation, accurate alignment or the installation method is outside your experience. |
| Long or commercial fence runs | Requires consistent setting-out, assembly and quality checks across many bays. | Experienced installers can help coordinate the work and maintain consistent workmanship. |
| Sloping ground or substantial level changes | Requires bay-by-bay measurements and a compatible stepped or raked design. | Seek support where component selection, bottom gaps or the slope arrangement is uncertain. |
| Concrete surfaces or retaining walls | Requires verified supporting concrete or wall capacity and an appropriate fixing design. | Obtain structural advice where required and use installers experienced with the approved fixing arrangement. |
| Large or automated gates | Gate loads, post reinforcement and hardware need separate consideration. | Specialist gate design and installation may be required. |
| Coastal or high-wind sites | The material specification, connections, post spacing and footings must match the environment. | Use the applicable engineering requirements and obtain qualified support for site-specific design and installation. |
Professional installers can help with excavation, post alignment, installation planning, and project handover.
For large commercial projects, using experienced installers can also help maintain consistent workmanship across multiple fence sections.
What Affects Colorbond Fence Installation Cost?
The final installation cost depends on several factors:
- Total fence length
- Fence height and material specification
- Soil conditions and excavation difficulty
- Slope and ground-level changes
- Old fence removal
- Gate quantities and dimensions
- Local labour rates
Projects involving difficult soil, retaining walls, or unusual access conditions may require additional work.
For more detailed cost information, read our Colorbond-style fencing cost and installation guide.
For wholesale projects, remember to separate the factory supply price from local installation labour, freight, and other project expenses.
Colorbond-Style Fencing Supply for Contractors and Wholesalers
Successful Colorbond fencing installation depends on both on-site workmanship and the quality and compatibility of the supplied materials.
JZH Fence manufactures and supplies steel fencing systems for contractors, wholesalers, distributors, builders, and project buyers.
Standard and Custom Fence Components
Our product range includes steel infill sheets, posts, rails, accessories, and matching gate options.
Depending on the order, customers can request different panel profiles, heights, colours, and material specifications.
Common options include 1.5 m, 1.8 m, and 2.1 m fence heights, with final dimensions confirmed against the project requirements.
For customised projects, drawings and specifications should be approved before production.
Factory Quality Checks and Export Packaging
For bulk shipments, product consistency and component compatibility are important.
Our production and quality-control procedures include checking the required specifications and inspecting components before dispatch.
Relevant checks may include:
- Product dimensions
- Steel and coating specifications
- Surface finish
- Accessory quantities
- Packaging condition
- Required product labels
JZH Fence can also discuss export packaging arrangements for container shipments and repeat wholesale orders.
The exact inspection records and packaging configuration depend on the order.
Project Drawings and Installation Support
To prepare an accurate quotation, provide:
- Total fence length and height
- Panel profile and colour
- Required steel thickness and coating
- Number and dimensions of gates
- Post installation method
- Ground conditions and slope details
- Estimated order quantity
- Destination country or port
- Packaging and delivery requirements
For customised products, photographs and drawings are especially helpful.
With these details, JZH Fence can review the requested configuration and prepare a project-specific supply proposal.
Frequently Asked Questions About Colorbond Fence Installation
How Deep Should Colorbond Fence Posts Be Installed?
The required post-hole depth depends on fence height, soil strength, wind exposure, and footing design. Some standard residential configurations use depths around 600 mm, but this is not a universal requirement. Check the manufacturer’s engineering specifications before excavation.
How Far Apart Should Colorbond Fence Posts Be?
Many Australian modular steel fence systems use bays around 2.4 m wide. However, actual post-centre spacing depends on the posts, rails, and panel system. Always use the installation dimensions specified for your selected product.
Can You Install Colorbond Fencing on a Slope?
Yes. Colorbond-style fencing can be installed on sloping ground using stepped or raked installation methods where the product design permits. The correct method depends on the gradient, panel compatibility, and acceptable gaps beneath the fence.
Can Colorbond Fencing Be Installed on Concrete?
Yes, when the concrete and fixing system are suitable. Base-plated posts can be attached to appropriately designed concrete foundations or slabs. The anchors, concrete capacity, edge distances, and wind loads must be checked.
How Long Does It Take to Install a Colorbond Fence?
Installation time depends on the total length, number of posts, site access, ground conditions, and complexity. Concrete curing and any required approvals should also be included in the construction schedule.
How Much Does Colorbond Fencing Installation Cost in Australia?
Costs vary according to location, labour rates, fence height, materials, and site conditions. Sloping ground, old fence removal, and additional gates may increase the overall cost. Request a local contractor’s quotation based on the complete project requirements.
Get Colorbond-Style Fencing Materials from JZH Fence
A successful Colorbond fencing installation begins before the first post hole is dug.
Accurate measurements, compatible components, suitable foundations, and the right installation method contribute to a better finished fence.
For contractors and wholesalers, confirming these details before ordering can also help reduce delays and unnecessary material adjustments.
JZH Fence supplies Colorbond-style steel fencing systems for residential developments, commercial boundaries, and wholesale distribution.
We support standard and customised steel panels, posts, rails, matching gates, and project-specific supply requirements.
Planning a new fencing project? Send us your drawings, required dimensions, and estimated quantities.
Request a Quote for Your Colorbond-Style Fencing Project
Looking for a reliable Colorbond-style fencing manufacturer or wholesale supplier?
Tell us about your project. Our team can review your material requirements and provide a quotation based on your specifications.
Please include your company, destination, fence length and height, estimated quantity, gate requirements and site conditions in your message.
You can also contact JZH Fence directly for quotations, product information, and project supply enquiries.
COLORBOND® is a registered trademark of BlueScope Steel Limited. JZH Fence supplies Colorbond-style steel fencing systems and is not affiliated with or endorsed by BlueScope Steel Limited. Product specifications and warranties should be confirmed for the actual materials supplied.